آموزش Flexbox به زبان ساده
بعد از آموزشهای مرتبط با css قصد دارم تا در رابطه با flex box به دلیل اهمیت و کاربرد آنها در این مقاله به طور کامل بپردازم. Flex box بسیار ساده و در عین حال بسیار کاربردی میباشند. در ادامه با آموزش Flexbox به زبان ساده با ما همراه باشید.
همانطور که در مقالات آموزش css مطرح کردم، روشهای مختلفی برای قرار دادن المان در وسط یک المان و یا صفحه و یا قرار دادن المانها در کنار یکدیگر وجود دارد. Flex box این امکان را به شما میدهد که به سادگی تمامی المانها را در یک ردیف (با توجه به عرض المان) قرار دهید و یا آنها را در یک ستون قرار دهید.
همچنین میتوانید به سادگی در وسط یک المان از لحاظ تراز عرضی و طولی ( هم از نظر عرض در وسط صفحه و هم از لحاظ ارتفاع) قرار دهید. Flex box در طراحی صفحات ریسپانسیو (نمایش در عرض و ارتفاعهای مختلف) بسیار کمک کننده میباشد و میتوانید در طراحی این صفحات از flex box بهره ببرید. با مطالعه ی این مقاله میتوانید با ویژگیflex box آشنا شوید و از آن در طراحی صفحات خود استفاده کنید.
برای استفاده از ویژگیهای flex box نیاز است تا ابتدا نحوهی نمایش المان در صفحه را به صورت flex تعریف کنید. در نمونهی زیر المان div با کلاس flex-container به صورت flex تعریف شده است. پس از اینکه display که نحوهی نمایش المان در صفحه میباشد با مقدار flex تعریف شود، ویژگیهای پیشفرضی که flex box دارد را المان مورد نظر دریافت میکند.
<!DOCTYPE html>
<html>
  <head>
    <style>
      .flex-container {
        display: flex;
        background-color: DodgerBlue;
      }
      .block-container {
        background-color: DodgerBlue;
      }

      .flex-container > div {
        background-color: #f1f1f1;
        margin: 10px;
        padding: 20px;
        font-size: 30px;
      }

      .block-container > div {
        background-color: #f1f1f1;
        margin: 10px;
        padding: 20px;
        font-size: 30px;
      }
    </style>
  </head>
  <body>
    <div class="flex-container">
      <div>1</div>
      <div>2</div>
      <div>3</div>
    </div>
    <br>
    <div class="block-container">
      <div>1</div>
      <div>2</div>
      <div>3</div>
    </div>
  </body>
</html>
برای درک بهتر تفاوت بین نحوهی نمایش یک المان به صورت flex و یا غیر flex به شکل زیر که حاصل مثال بالاست، توجه کنید.

در این شکل همانطور که مشاهده میکنید، در المان اول که به صورت flex box تعریف شده است، المانهای داخلی آن، در کنار یکدیگر و در راستای افقی قرار گرفتهاند. (شما میتوانید این المان های داخلی را به صورت عمودی نیز نمایش دهید و دلیل نمایش افقی در حالت فعلی به دلیل ویژگی پیشفرض تعریف شده در flex box می باشد.)
شما همین کار با استفاده از float نیز میتوانید انجام دهید اما flex box ویژگیهایی دارد که به شما این امکان را میدهد تا نمایش بهتری نسبت به float داشته باشید.

اولین ویژگی مورد بررسی از flex box، ویژگی نحوه ی چیدمان المانها در صفحه می باشد. برای اینکار از ویژگی ای به نام flex-direction استفاده می شود که به شما این امکان را می دهد تا المانهای مورد نظرتان را به صورت افقی و یا عمودی در یک راستا قرار دهید. این ویژگی ۴ مقدار دریافت میکند:
- row: در این حالت تمامی المان ها در کنار یکدیگر به صورت افقی قرار میگیرند. ( حالت پیش فرض)
- Row-reverse: در این حالت المانها از آخر به اول در کنار یکدیگر به صورت افقی قرار میگیرند.
- Column: در این حالت تمامی المان ها به صورت عمودی در یک راستا قرار می گیرند.
- Column-reverse: در این حالت تمامی المانها از آخر به اول به صورت عمودی در یک راستا قرار می گیرند.
در حالت column
<!DOCTYPE html>
<html>
<head>
<style>
.flex-container {
  display: flex;
  flex-direction: column;
  background-color: DodgerBlue;
}

.flex-container > div {
  background-color: #f1f1f1;
  width: 100px;
  margin: 10px;
  text-align: center;
  line-height: 75px;
  font-size: 30px;
}
</style>
</head>
<body>
<h1>The flex-direction Property</h1>
<div class="flex-container">
  <div>1</div>
  <div>2</div>
  <div>3</div>
</div>

</body>
</html>
در حالت column-reverse
<!DOCTYPE html>
<html>
  <head>
    <style>
      .flex-container {
        display: flex;
        flex-direction: column-reverse;
        background-color: DodgerBlue;
      }

      .flex-container > div {
        background-color: #f1f1f1;
        width: 100px;
        margin: 10px;
        text-align: center;
        line-height: 75px;
        font-size: 30px;
      }
    </style>
  </head>
  <body>
    <h1>The flex-direction Property</h1>
    <div class="flex-container">
      <div>1</div>
      <div>2</div>
      <div>3</div>
    </div>
  </body>
</html>
در حالت row-reverse
<!DOCTYPE html>
<html>
  <head>
    <style>
      .flex-container {
        display: flex;
        flex-direction: row-reverse;
        background-color: DodgerBlue;
      }

      .flex-container > div {
        background-color: #f1f1f1;
        width: 100px;
        margin: 10px;
        text-align: center;
        line-height: 75px;
        font-size: 30px;
      }
    </style>
  </head>
  <body>
    <h1>The flex-direction Property</h1>
    <div class="flex-container">
      <div>1</div>
      <div>2</div>
      <div>3</div>
    </div>
  </body>
</html>
ویژگی بعدی تعریف شده در flex box، ویژگی flex-wrap می باشد. این ویژگی بدین صورت میباشد که این امکان را میدهد که در صورتی که تعداد المانها در یک ردیف در حالت افقی و یا عمودی به انتهای عرض و یا ارتفاع المان رسید، سایر المانها را در خطهای بعدی در المان قرار دهد. این ویژگی دو مقدار دریافت می کند:
- Wrap: در این حالت در صورتی که عرض و یا ارتفاع ناشی از المان ها در داخل المان مورد نظر، از عرض و یا ارتفاع المان بیشتر شود، آنها را در ردیف بعدی در داخل المان قرار می دهد.
- Wrap-reverse: در این حالت المانها از آخر به اول در ردیفها قرار می گیرند. همانند wrap می باشد و تنها تفاوت در قرار گیری المانها به ترتیب در کنار یکدیگر می باشد.
- Nowrap: در این حالت المانها تمامی در یک ردیف قرار می گیرند و در صورتی که عرض و یا ارتفاع ناشی از المانها از عرض و یا ارتفاع المان مورد نظر بیشتر شود، کماکان المانها در داخل المان مورد نظر قرار می گیرند. (در صورتی که عرض و یا ارتفاع مشخصی المان های داخلی نداشتند، عرض و یا ارتفاع آنها به صورت اتوماتیک کاهش و یا افزایش می یابد.
<!DOCTYPE html>
<html>
  <head>
    <style>
      .flex-container {
        display: flex;
        flex-wrap: wrap;
        background-color: DodgerBlue;
      }

      .flex-container > div {
        background-color: #f1f1f1;
        width: 100px;
        margin: 10px;
        text-align: center;
        line-height: 75px;
        font-size: 30px;
      }
    </style>
  </head>
  <body>
    <h1>The flex-wrap Property</h1>

    <p>
      The "flex-wrap: wrap;" specifies that the flex items will wrap if
      necessary:
    </p>

    <div class="flex-container">
      <div>1</div>
      <div>2</div>
      <div>3</div>
      <div>4</div>
      <div>5</div>
      <div>6</div>
      <div>7</div>
      <div>8</div>
      <div>9</div>
      <div>10</div>
      <div>11</div>
      <div>12</div>
    </div>

  </body>
</html>
مثال بالا را در تصویر زیر میتوانید مشاهده کنید:

حالت wrap-reverse
<!DOCTYPE html>
<html>
  <head>
    <style>
      .flex-container {
        display: flex;
        flex-wrap: wrap-reverse;
        background-color: DodgerBlue;
      }

      .flex-container > div {
        background-color: #f1f1f1;
        width: 100px;
        margin: 10px;
        text-align: center;
        line-height: 75px;
        font-size: 30px;
      }
    </style>
  </head>
  <body>
    <h1>The flex-wrap Property</h1>

    <p>
      The "flex-wrap: wrap-reverse;" specifies that the flex items will wrap if
      necessary, in reverse order:
    </p>

    <div class="flex-container">
      <div>1</div>
      <div>2</div>
      <div>3</div>
      <div>4</div>
      <div>5</div>
      <div>6</div>
      <div>7</div>
      <div>8</div>
      <div>9</div>
      <div>10</div>
      <div>11</div>
      <div>12</div>
    </div>
  </body>
</html>
تفاوت آن را با حالت wrap میتوانید مشاهده کنید:

همانطور که مشاهده میکنید، در این حالت در پایین ترین ردیف المان ها تا انتهای فضایی که امکانش را داشتند در کنار یکدیگر قرار گرفته اند و سایر المانها به ترتیب ردیف های بالاتر را پر می کنند.
در حالت nowrap
<!DOCTYPE html>
<html>
  <head>
    <style>
      .flex-container {
        display: flex;
        flex-wrap: nowrap;
        background-color: DodgerBlue;
      }

      .flex-container > div {
        background-color: #f1f1f1;
        width: 100px;
        margin: 10px;
        text-align: center;
        line-height: 75px;
        font-size: 30px;
      }
    </style>
  </head>
  <body>
    <h1>The flex-wrap Property</h1>

    <p>
      The "flex-wrap: nowrap;" specifies that the flex items will not wrap (this
      is default):
    </p>

    <div class="flex-container">
      <div>1</div>
      <div>2</div>
      <div>3</div>
      <div>4</div>
      <div>5</div>
      <div>6</div>
      <div>7</div>
      <div>8</div>
      <div>9</div>
      <div>10</div>
      <div>11</div>
      <div>12</div>
    </div>

  </body>
</html>
در تصویر زیر میتوانید مشاهده کنید:

شما میتوانید از یک ویژگی استفاده کنید که دو ویژگی flex-direction و flex-wrap را با یکدیگر تعریف کنید. برای اینکار میتوانید از flex-flow استفاده کنید. شما میتوانید به ترتیب ابتدا flex-direction را مشخص کنید و سپس مقدار flex-wrap را تعیین کنید.
<!DOCTYPE html>
<html>
  <head>
    <style>
      .flex-container {
        display: flex;
        flex-flow: row wrap;
        background-color: DodgerBlue;
      }

      .flex-container > div {
        background-color: #f1f1f1;
        width: 100px;
        margin: 10px;
        text-align: center;
        line-height: 75px;
        font-size: 30px;
      }
    </style>
  </head>
  <body>
    <h1>The flex-flow Property</h1>

    <p>
      The flex-flow property is a shorthand property for the flex-direction and
      the flex-wrap properties.
    </p>

    <div class="flex-container">
      <div>1</div>
      <div>2</div>
      <div>3</div>
      <div>4</div>
      <div>5</div>
      <div>6</div>
      <div>7</div>
      <div>8</div>
      <div>9</div>
      <div>10</div>
      <div>11</div>
      <div>12</div>
    </div>
  </body>
</html>
ویژگی دیگری که در flex box مورد استفاده قرار می گیرد و قابل تعریف میباشد، justify-content می باشد. این ویژگی این امکان را به شما میدهد تا المانها را همراستا با جهت flex-direction در داخل المان پدر در مکانهای مختلف قرار دهید. با یکدیگر مقادیر مختلف این ویژگی را خواهیم دید.

اولین مقدار center می باشد که همانطور که از اسم آن مشخص است، المانها را در وسط المان پدر قرار می دهد.
” دقت کنید که برای استفاده از این ویژگی، نوع نمایش المان حتما باید به صورت flex باشد. “
<!DOCTYPE html>
<html>
<head>
<style>
.flex-container {
  display: flex;
  justify-content: center;
  background-color: DodgerBlue;
}

.flex-container > div {
  background-color: #f1f1f1;
  width: 100px;
  margin: 10px;
  text-align: center;
  line-height: 75px;
  font-size: 30px;
}
</style>
</head>
<body>
<h1>The justify-content Property</h1>

<p>The "justify-content: center;" aligns the flex items at the center of the container:</p>

<div class="flex-container">
  <div>1</div>
  <div>2</div>
  <div>3</div>
</div>

</body>
</html>
مقدار بعدی که حالت پیشفرض نیز میباشد، flex-start است. در این حالت المانهای داخل المان پدر، از ابتدای المان پدر در کنار یکدیگر قرار میگیرند.
<!DOCTYPE html>
<html>
  <head>
    <style>
      .flex-container {
        display: flex;
        justify-content: flex-start;
        background-color: DodgerBlue;
      }

      .flex-container > div {
        background-color: #f1f1f1;
        width: 100px;
        margin: 10px;
        text-align: center;
        line-height: 75px;
        font-size: 30px;
      }
    </style>
  </head>
  <body>
    <h1>The justify-content Property</h1>

    <p>
      The "justify-content: flex-start;" aligns the flex items at the beginning
      of the container (this is default):
    </p>

    <div class="flex-container">
      <div>1</div>
      <div>2</div>
      <div>3</div>
    </div>
  </body>
</html>
مقدار بعدی flex-end میباشد. در این حالت المانها در داخل المان پدر، از انتهای المان پدر قرار می گیرند.
<!DOCTYPE html>
<html>
  <head>
    <style>
      .flex-container {
        display: flex;
        justify-content: flex-end;
        background-color: DodgerBlue;
      }

      .flex-container > div {
        background-color: #f1f1f1;
        width: 100px;
        margin: 10px;
        text-align: center;
        line-height: 75px;
        font-size: 30px;
      }
    </style>
  </head>
  <body>
    <h1>The justify-content Property</h1>

    <p>
      The "justify-content: flex-end;" aligns the flex items at the end of the
      container:
    </p>

    <div class="flex-container">
      <div>1</div>
      <div>2</div>
      <div>3</div>
    </div>
  </body>
</html>
مقدار بعدی space-around میباشد. این مقدار فواصلی را قبل، بین و بعد از هر المان به وجود میآورد.
<!DOCTYPE html>
<html>
  <head>
    <style>
      .flex-container {
        display: flex;
        justify-content: space-around;
        background-color: DodgerBlue;
      }

      .flex-container > div {
        background-color: #f1f1f1;
        width: 100px;
        margin: 10px;
        text-align: center;
        line-height: 75px;
        font-size: 30px;
      }
    </style>
  </head>
  <body>
    <h1>The justify-content Property</h1>

    <p>
      The "justify-content: space-around;" displays the flex items with space
      before, between, and after the lines:
    </p>

    <div class="flex-container">
      <div>1</div>
      <div>2</div>
      <div>3</div>
    </div>
  </body>
</html>
مقدار بعدی space-between میباشد. این ویژگی تنها فواصلی را بین المانها ایجاد میکند و قبل و بعد المانها فاصله ای وجود نخواهد داشت.
<!DOCTYPE html>
<html>
  <head>
    <style>
      .flex-container {
        display: flex;
        justify-content: space-between;
        background-color: DodgerBlue;
      }

      .flex-container > div {
        background-color: #f1f1f1;
        width: 100px;
        margin: 10px;
        text-align: center;
        line-height: 75px;
        font-size: 30px;
      }
    </style>
  </head>
  <body>
    <h1>The justify-content Property</h1>

    <p>
      The "justify-content: space-between;" displays the flex items with space
      between the lines:
    </p>

    <div class="flex-container">
      <div>1</div>
      <div>2</div>
      <div>3</div>
    </div>
  </body>
</html>
مقدار بعدی space-evenly می باشد. این مقدار مشابه space-around عمل میکند با این تفاوت که فواصلی که بین المان ها و فاصله المان اول و اخر تا المان پدر، به صورت مساوی خواهد بود.
<!DOCTYPE html>
<html>
  <head>
    <style>
      .flex-container {
        display: flex;
        justify-content: space-evenly;
        background-color: DodgerBlue;
      }

      .flex-container > div {
        background-color: #f1f1f1;
        width: 100px;
        margin: 10px;
        text-align: center;
        line-height: 75px;
        font-size: 30px;
        margin: 30px;
      }
    </style>
  </head>
  <body>
    <h1>The justify-content Property</h1>

    <div class="flex-container">
      <div>1</div>
      <div>2</div>
      <div>3</div>
    </div>
  </body>
</html>
ویژگی بعدی در flex box ویژگی align-items می باشد. این ویژگی بر خلاف ویژگی justify-content که المان را در راستای محور افقی تغییر مکان میدهد، مکان المان را در جهت عمودی تغییر می دهد.
اولین مقدار از این ویژگی را که مورد بررسی قرار میدهم، مقدار center می باشد. این مقدار المان مورد نظر را در راستای عمودی در وسط المان پدر قرار می دهد.
<!DOCTYPE html>
<html>
  <head>
    <style>
      .flex-container {
        display: flex;
        height: 200px;
        align-items: center;
        background-color: DodgerBlue;
      }

      .flex-container > div {
        background-color: #f1f1f1;
        width: 100px;
        margin: 10px;
        text-align: center;
        line-height: 75px;
        font-size: 30px;
      }
    </style>
  </head>
  <body>
    <h1>The align-items Property</h1>

    <div class="flex-container">
      <div>1</div>
      <div>2</div>
      <div>3</div>
    </div>
  </body>
</html>
نمونه آن:

مقادیری که align-items دریافت میکند، تقریبا مشابه با مقادیر justify-content میباشد. مقدار بعدی flex-start می باشد. همانطور که در justify-content هم گفتیم، این مقدار المانها را در ابتدای المان پدر قرار می دهد. برای این ویژگی به دلیل اینکه در راستای عمودی مکان المان را تغییر می دهد، موجب می شود تا المان مورد نظر در قسمت بالایی المان پدر قرار گیرد.
<!DOCTYPE html>
<html>
  <head>
    <style>
      .flex-container {
        display: flex;
        height: 200px;
        align-items: flex-start;
        background-color: DodgerBlue;
      }

      .flex-container > div {
        background-color: #f1f1f1;
        width: 100px;
        margin: 10px;
        text-align: center;
        line-height: 75px;
        font-size: 30px;
      }
    </style>
  </head>
  <body>
    <h1>The align-items Property</h1>

    <div class="flex-container">
      <div>1</div>
      <div>2</div>
      <div>3</div>
    </div>
  </body>
</html>
نمونه آن:

مقدار بعدی flex-end می باشد که این مقدار بر خلاف مقدار قبلی، المان مورد نظر را در قسمت پایینی المان پدر قرار می دهد.
<!DOCTYPE html>
<html>
  <head>
    <style>
      .flex-container {
        display: flex;
        height: 200px;
        align-items: flex-end;
        background-color: DodgerBlue;
      }

      .flex-container > div {
        background-color: #f1f1f1;
        width: 100px;
        margin: 10px;
        text-align: center;
        line-height: 75px;
        font-size: 30px;
      }
    </style>
  </head>
  <body>
    <h1>The align-items Property</h1>

    <div class="flex-container">
      <div>1</div>
      <div>2</div>
      <div>3</div>
    </div>
  </body>
</html>
مقدار بعدی stretch می باشد، این مقدار موجب میباشد تا المان مورد نظر به طور کامل تا ارتفاع المان پدر کشیده شود.
<!DOCTYPE html>
<html>
  <head>
    <style>
      .flex-container {
        display: flex;
        height: 200px;
        align-items: stretch;
        background-color: DodgerBlue;
      }

      .flex-container > div {
        background-color: #f1f1f1;
        width: 100px;
        margin: 10px;
        text-align: center;
        line-height: 75px;
        font-size: 30px;
      }
    </style>
  </head>
  <body>
    <h1>The align-items Property</h1>

    <p>
      The "align-items: stretch;" stretches the flex items to fill the container
      (this is default):
    </p>

    <div class="flex-container">
      <div>1</div>
      <div>2</div>
      <div>3</div>
    </div>
  </body>
</html>
نمونهی آن:

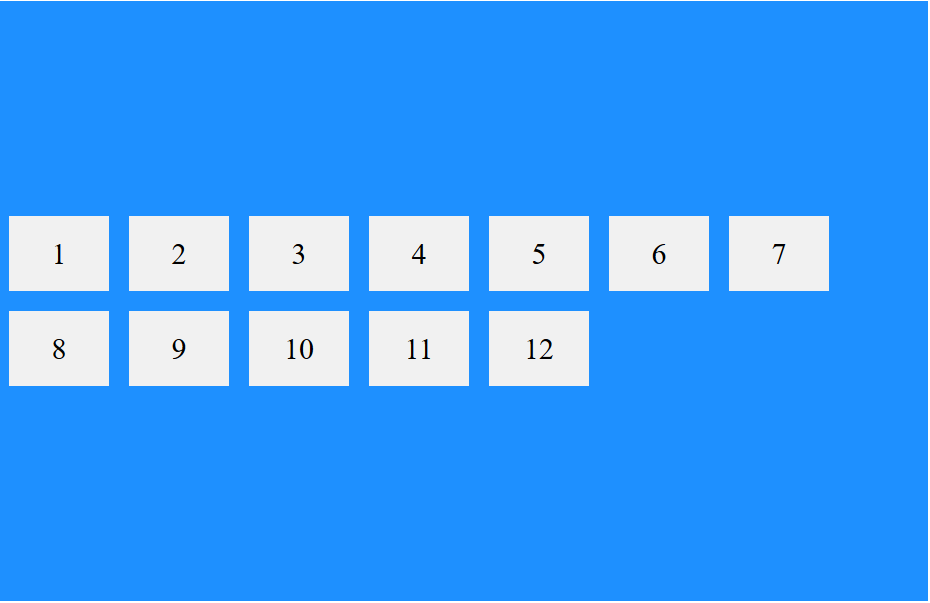
ویژگی بعدی در flex-box، ویژگی align-content میباشد.
این ویژگی مشابه justify-content ولی در محور عمودی عمل میکند. تفاوتی که بین align-content و align-items وجود دارد، در این میباشد که در ویژگی align-items، المانهای flex تراز بندی میشوند ولی در ویژگی align-content، ترازبندی در خطوط flex صورت می گیرد و در واقع شما با محوری که خطوط flex قرار دارند کار میکنید.

مقادیری که این ویژگی دریافت میکند، دقیقا همان مقادیر justify-content میباشد، با این تفاوت که این ویژگی بر روی تراز المانها در محور عملی اثر میگذارد.
مقدار center در ویژگی align-content به صورت زیر میباشد:
<!DOCTYPE html>
<html>
  <head>
    <style>
      .flex-container {
        display: flex;
        height: 600px;
        flex-wrap: wrap;
        align-content: center;
        background-color: DodgerBlue;
      }

      .flex-container > div {
        background-color: #f1f1f1;
        width: 100px;
        margin: 10px;
        text-align: center;
        line-height: 75px;
        font-size: 30px;
      }
    </style>
  </head>
  <body>
    <h1>The align-content Property</h1>

    <p>
      The "align-content: center;" displays the flex lines in the middle of the
      container:
    </p>

    <div class="flex-container">
      <div>1</div>
      <div>2</div>
      <div>3</div>
      <div>4</div>
      <div>5</div>
      <div>6</div>
      <div>7</div>
      <div>8</div>
      <div>9</div>
      <div>10</div>
      <div>11</div>
      <div>12</div>
    </div>
  </body>
</html>
که تصویر آن به صورت زیر خواهد شد:
در حالی که اگر با همین استایل تنها align-cotent را به align-items تبدیل کنید، نمایش المانها به صورت زیر خواهد شد:
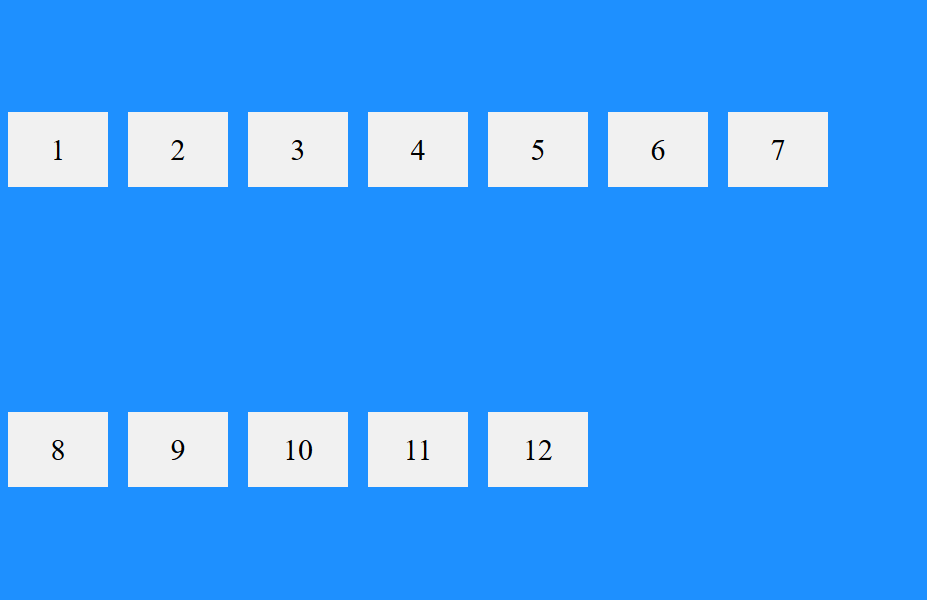
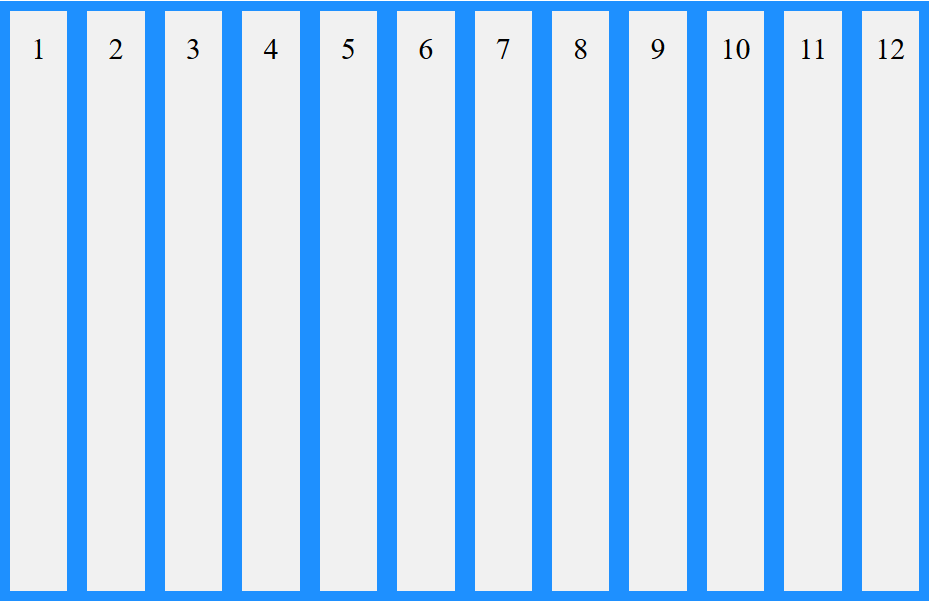
به دلیل وجود ویژگی flex-wrap المانها به صورت بالا قرار گرفته است، در صورتی که این ویژگی برداشته شود، تمامی المانها در خط وسط قرار می گیرند ولی اگر ویژگی wrap در حالتی که align-content با مقدار center باشد، برداشته شود، تمامی المانها تمامی ارتفاع المان پدر خود را خواهند گرفت.
مقدار بعدی مورد بررسی space-between می باشد. در justify-content اشاره کردیم که این مقدار، موجب می شود تا المانها دارای فاصله با یکدیگر شوند و این فاصله طوری تنظیم می شود که اولین المان در ابتدای المان پدر و آخرین المان در انتهای المان پدر قرار گیرند.

در اینجا این مقدار موجب می باشد تا المانها در راستای محور عمودی با یکدگیر فاصله پیدا کنند و به همانند عملکرد این مقدار در justify-content، اولین المان در ابتدای المان پدر و آخرین المان در انتهای المان پدر قرار گیرند.
برای درک بهتر مثال زیر را تست کنید:
<!DOCTYPE html>
<html>
  <head>
    <style>
      .flex-container {
        display: flex;
        height: 600px;
        flex-wrap: wrap;
        align-content: space-between;
        background-color: DodgerBlue;
      }

      .flex-container > div {
        background-color: #f1f1f1;
        width: 100px;
        margin: 10px;
        text-align: center;
        line-height: 75px;
        font-size: 30px;
      }
    </style>
  </head>
  <body>
    <h1>The align-content Property</h1>

    <p>
      The "align-content: space-between;" displays the flex lines with equal
      space between them:
    </p>

    <div class="flex-container">
      <div>1</div>
      <div>2</div>
      <div>3</div>
      <div>4</div>
      <div>5</div>
      <div>6</div>
      <div>7</div>
      <div>8</div>
      <div>9</div>
      <div>10</div>
      <div>11</div>
      <div>12</div>
    </div>
  </body>
</html>
در کنار مقدار space-between دو مقدار دیگر یعنی space-around و space-evenly نیز وجود دارد. مقدار space-around، فواصلی را علاوه بر بین المانها، بین المانها با قسمت بالا و پایین المان پدر (در justify-content اشاره کردیم که این فواصل بین المان ها با قسمت چپ و راست المان پدر بود) ایجاد میکند.
<!DOCTYPE html>
<html>
  <head>
    <style>
      .flex-container {
        display: flex;
        height: 600px;
        flex-wrap: wrap;
        align-content: space-around;
        background-color: DodgerBlue;
      }

      .flex-container > div {
        background-color: #f1f1f1;
        width: 100px;
        margin: 10px;
        text-align: center;
        line-height: 75px;
        font-size: 30px;
      }
    </style>
  </head>
  <body>
    <h1>The align-content Property</h1>

    <p>
      The "align-content: space-around;" displays the flex lines with space
      before, between, and after them:
    </p>

    <div class="flex-container">
      <div>1</div>
      <div>2</div>
      <div>3</div>
      <div>4</div>
      <div>5</div>
      <div>6</div>
      <div>7</div>
      <div>8</div>
      <div>9</div>
      <div>10</div>
      <div>11</div>
      <div>12</div>
    </div>
  </body>
</html>
مقدار آخر هم space-evenly میباشد که همانند space-around فواصل را بین المان ها و ردیف اول با قسمت بالای المان پدر و ردیف آخر با قسمت پایین المان پدر ایجاد میکند با این تفاوت که در اینجا هر سه فاصله با یکدیگر برابر میباشند.
<!DOCTYPE html>
<html>
  <head>
    <style>
      .flex-container {
        display: flex;
        height: 600px;
        flex-wrap: wrap;
        align-content: space-evenly;
        background-color: DodgerBlue;
      }

      .flex-container > div {
        background-color: #f1f1f1;
        width: 100px;
        margin: 10px;
        text-align: center;
        line-height: 75px;
        font-size: 30px;
      }
    </style>
  </head>
  <body>
    <h1>The align-content Property</h1>

    <p>
      The "align-content: space-around;" displays the flex lines with space
      before, between, and after them:
    </p>

    <div class="flex-container">
      <div>1</div>
      <div>2</div>
      <div>3</div>
      <div>4</div>
      <div>5</div>
      <div>6</div>
      <div>7</div>
      <div>8</div>
      <div>9</div>
      <div>10</div>
      <div>11</div>
      <div>12</div>
    </div>
  </body>
</html>
دو مقدار دیگر flex-start و flex-end می باشند. این دو مقدار المانها را در ابتدا و انتهای المان پدر قرار میدهند.
<!DOCTYPE html>
<html>
  <head>
    <style>
      .flex-container {
        display: flex;
        height: 600px;
        flex-wrap: wrap;
        align-content: flex-start;
        background-color: DodgerBlue;
      }

      .flex-container > div {
        background-color: #f1f1f1;
        width: 100px;
        margin: 10px;
        text-align: center;
        line-height: 75px;
        font-size: 30px;
      }
    </style>
  </head>
  <body>
    <h1>The align-content Property</h1>

    <p>
      The "align-content: flex-start;" displays the flex lines at the start of
      the container:
    </p>

    <div class="flex-container">
      <div>1</div>
      <div>2</div>
      <div>3</div>
      <div>4</div>
      <div>5</div>
      <div>6</div>
      <div>7</div>
      <div>8</div>
      <div>9</div>
      <div>10</div>
      <div>11</div>
      <div>12</div>
    </div>
  </body>
</html>
مقدار آخر نیز stretch میباشد. این مقدار عملکردی همچون stretch در align-items دارد.
<!DOCTYPE html>
<html>
  <head>
    <style>
      .flex-container {
        display: flex;
        height: 600px;
        flex-wrap: wrap;
        align-content: stretch;
        background-color: DodgerBlue;
      }

      .flex-container > div {
        background-color: #f1f1f1;
        width: 100px;
        margin: 10px;
        text-align: center;
        line-height: 75px;
        font-size: 30px;
      }
    </style>
  </head>
  <body>
    <h1>The align-content Property</h1>

    <p>
      The "align-content: stretch;" stretches the flex lines to take up the
      remaining space (this is default):
    </p>

    <div class="flex-container">
      <div>1</div>
      <div>2</div>
      <div>3</div>
      <div>4</div>
      <div>5</div>
      <div>6</div>
      <div>7</div>
      <div>8</div>
      <div>9</div>
      <div>10</div>
      <div>11</div>
      <div>12</div>
    </div>
  </body>
</html>
یک نکته ی بسیار مهمی که نیاز است به آن توجه کنید این می باشد که در صورتی که شما جهت flex را تغییر دهید یعنی flex-direction را مقدار column بدهید، عملکرد ویژگیهای justify-content، align-items و align-content بر عکس خواهد شد. به این معنا که مقادیر justify-content، وضعیت المان را نسبت به محور عمودی تغییر میدهد و align-items و align-content نیز وضعیت المان را نسبت به محور افقی تغییر می دهد.
برای اینکه نحوه ی عملکرد این ویژگیها را فراموش نکنید، همیشه به خاطر داشته باشید که ویژگی justify-content وضعیت المان و یا به عبارتی تراز آن را در راستای جهت flex box تغییر می دهد و align-items و align-content نیز وضعیت المان و یا به عبارتی تراز آن را در جهت عمود بر راستای جهت flex box تغییر می دهد.
از جمله کاربردی ترین ویژگی flex box، قرار دادن یک المان دقیقا در وسط المان پدر و یا صفحه می باشد. برای اینکار کافیست وضعیت نمایش المان را به صورت flex درآورید و از دو ویژگی justify-content و align-items با مقدار center استفاده کنید.
<!DOCTYPE html>
<html>
  <head>
    <style>
      .flex-container {
        display: flex;
        justify-content: center;
        align-items: center;
        height: 300px;
        background-color: DodgerBlue;
      }

      .flex-container > div {
        background-color: #f1f1f1;
        color: white;
        width: 100px;
        height: 100px;
      }
    </style>
  </head>
  <body>
    <h1>Perfect Centering</h1>

    <p>
      A container with both the justify-content and the align-items properties
      set to <em>center</em> will align the item(s) in the center (in both
      axis).
    </p>

    <div class="flex-container">
      <div></div>
    </div>
  </body>
</html>
المانهای flex box یکی ویژگی را میتوانند دریافت کنند که به آنها این امکان را میدهد تا بتوان به ترتیب دلخواه نمایش داد. این ویژگی order نام دارد. در این جا هر کدام از المانها متناسب با ترتیبی که برای آن در نظر گرفته شده است، در صفحه نمایش داده می شوند.
<!DOCTYPE html>
<html>
  <head>
    <style>
      .flex-container {
        display: flex;
        align-items: stretch;
        background-color: #f1f1f1;
      }

      .flex-container > div {
        background-color: DodgerBlue;
        color: white;
        width: 100px;
        margin: 10px;
        text-align: center;
        line-height: 75px;
        font-size: 30px;
      }
    </style>
  </head>
  <body>
    <h1>The order Property</h1>

    <p>Use the order property to sort the flex items as you like:</p>

    <div class="flex-container">
      <div style="order: 3">1</div>
      <div style="order: 2">2</div>
      <div style="order: 4">3</div>
      <div style="order: 1">4</div>
    </div>
  </body>
</html>
ویژگی بعدی در flex box، ویژگی flex-grow می باشد. این ویژگی این امکان را به شما میدهد تا مشخص کنید که یک المان نسبت به المانهای دیگر فضای بیشتری از المان پدر را پر کند، بدون آنکه به آنها عرض خاصی بدهید و این نسبت را متناسب با عرض هر المان تغییر میدهد. در این مثال، دو المان اول مقدار ۱ دریافت کردند و المان سوم مقدار ۸. این بدین معنا می باشد که المان سوم دارای عرض ۸ برابر دو المان اول می باشد و دو المان اول نیز عرض های برابر خواهند داشت. در حالت پیش فرض مقدار این ویژگی ۰ می باشد.
<!DOCTYPE html>
<html>
<head>
<style>
.flex-container {
  display: flex;
  align-items: stretch;
  background-color: #f1f1f1;
}

.flex-container > div {
  background-color: DodgerBlue;
  color: white;
  margin: 10px;
  text-align: center;
  line-height: 75px;
  font-size: 30px;
}
</style>
</head>
<body>
<h1>The flex-grow Property</h1>

<p>Make the third flex item grow eight times faster than the other flex items:</p>

<div class="flex-container">
  <div style="flex-grow: 1">1</div>
  <div style="flex-grow: 1">2</div>
  <div style="flex-grow: 8">3</div>
</div>

</body>
</html>
ویژگی بعدی در flex-box، ویژگی flex-shrink می باشد. این ویژگی موجب میباشد تا المانی نسبت به بقیه المانها کوچک تر شود. این ویژگی نقطه مقابل ویژگی flex-grow می باشد.
<!DOCTYPE html>
<html>
  <head>
    <style>
      .flex-container {
        display: flex;
        align-items: stretch;
        background-color: #f1f1f1;
      }

      .flex-container > div {
        background-color: DodgerBlue;
        color: white;
        width: 100px;
        margin: 10px;
        text-align: center;
        line-height: 75px;
        font-size: 30px;
      }
    </style>
  </head>
  <body>
    <h1>The flex-shrink Property</h1>

    <p>
      Do not let the third flex item shrink as much as the other flex items:
    </p>

    <div class="flex-container">
      <div>1</div>
      <div>2</div>
      <div style="flex-shrink: 0">3</div>
      <div>4</div>
      <div>5</div>
      <div>6</div>
      <div>7</div>
      <div>8</div>
      <div>9</div>
      <div>10</div>
    </div>
  </body>
</html>
ویژگی بعدی مشخص کننده ی طول اولیه یک المان flex می باشد. این ویژگی flex-basis نام دارد.
<!DOCTYPE html>
<html>
  <head>
    <style>
      .flex-container {
        display: flex;
        align-items: stretch;
        background-color: #f1f1f1;
      }

      .flex-container > div {
        background-color: DodgerBlue;
        color: white;
        width: 100px;
        margin: 10px;
        text-align: center;
        line-height: 75px;
        font-size: 30px;
      }
    </style>
  </head>
  <body>
    <h1>The flex-basis Property</h1>

    <p>Set the initial length of the third flex item to 200 pixels:</p>

    <div class="flex-container">
      <div>1</div>
      <div>2</div>
      <div style="flex-basis:200px">3</div>
      <div>4</div>
    </div>
  </body>
</html>
” توجه کنید که وقتی یک المانی از نوع flex می شود، تمامی المانهای فرزند آن نیز، میتوانند ویژگی flex را استفاده کنند. “
شما میتوانید سه ویژگی flex-grow، flex-shrink و flex-basis را صورت خلاصه و با استفاده از flex نیز تعریف کنید. برای اینکار تنها کافیست، مقادیر مورد نظر را به ترتیبی که گفته شد برای ویژگی flex تعریف کنید.
<!DOCTYPE html>
<html>
  <head>
    <style>
      .flex-container {
        display: flex;
        align-items: stretch;
        background-color: #f1f1f1;
      }

      .flex-container > div {
        background-color: DodgerBlue;
        color: white;
        width: 100px;
        margin: 10px;
        text-align: center;
        line-height: 75px;
        font-size: 30px;
      }
    </style>
  </head>
  <body>
    <h1>The flex Property</h1>

    <p>
      Make the third flex item not growable (0), not shrinkable (0), and with an
      initial length of 200 pixels:
    </p>

    <div class="flex-container">
      <div>1</div>
      <div>2</div>
      <div style="flex: 0 0 200px">3</div>
      <div>4</div>
    </div>
  </body>
</html>
آخرین ویژگی در flex-box، ویژگی align-self میباشد. این ویژگی مخصوص المانهای فرزند یک المان پدر از نوع flex می باشد. با استفاده از این ویژگی شما میتوانید المان خاصی از المانهای فرزند را تراز بندی کنید. این ویژگی زمانی کاربرد دارد که شما تنها المانهای خاصی را قصد داشته باشید تا در ابتدای المان پدر و یا در وسط آن قرار گیرد. در صورتی که از ویژگی های align-content و سایر ویژگیهای گفته شده در رابطه با تراز بندی یک المان، استفاده کنید، این ویژگیها تمامی المانهای داخل یک المان پدر را ترازبندی می کند. این ویژگی همچون align-items دارای مقادیر flex-start، flex-end و center می باشد.
مثال center
<!DOCTYPE html>
<html>
  <head>
    <style>
      .flex-container {
        display: flex;
        height: 200px;
        background-color: #f1f1f1;
      }

      .flex-container > div {
        background-color: DodgerBlue;
        color: white;
        width: 100px;
        margin: 10px;
        text-align: center;
        line-height: 75px;
        font-size: 30px;
      }
    </style>
  </head>
  <body>
    <h1>The align-self Property</h1>

    <p>
      The "align-self: flex-start;" aligns the selected flex item at the top of
      the container.
    </p>
    <p>
      The "align-self: flex-end;" aligns the selected flex item at the bottom of
      the container.
    </p>

    <div class="flex-container">
      <div>1</div>
      <div style="align-self: flex-start">2</div>
      <div style="align-self: flex-end">3</div>
      <div>4</div>
    </div>

    <p>
      The align-self property overrides the align-items property of the
      container.
    </p>
  </body>
</html>
تصویر آن:

مبحث flex-box در اینجا به پایان میرسد. همانطور که مشاهده کردید flex-boxها بسیار ساده هستند ولی بسیار کاربردی می باشد و برای هر طراح سمت کاربر سایتی ضروری است تا با flex-box و ویژگیهای آن آشنایی داشته باشد.

